


 STEP BY STEP TUTORIAL
FREE DOWNLOADABLE PATTERNS:
PATTERN CUTTING
CORTAR PATRONES

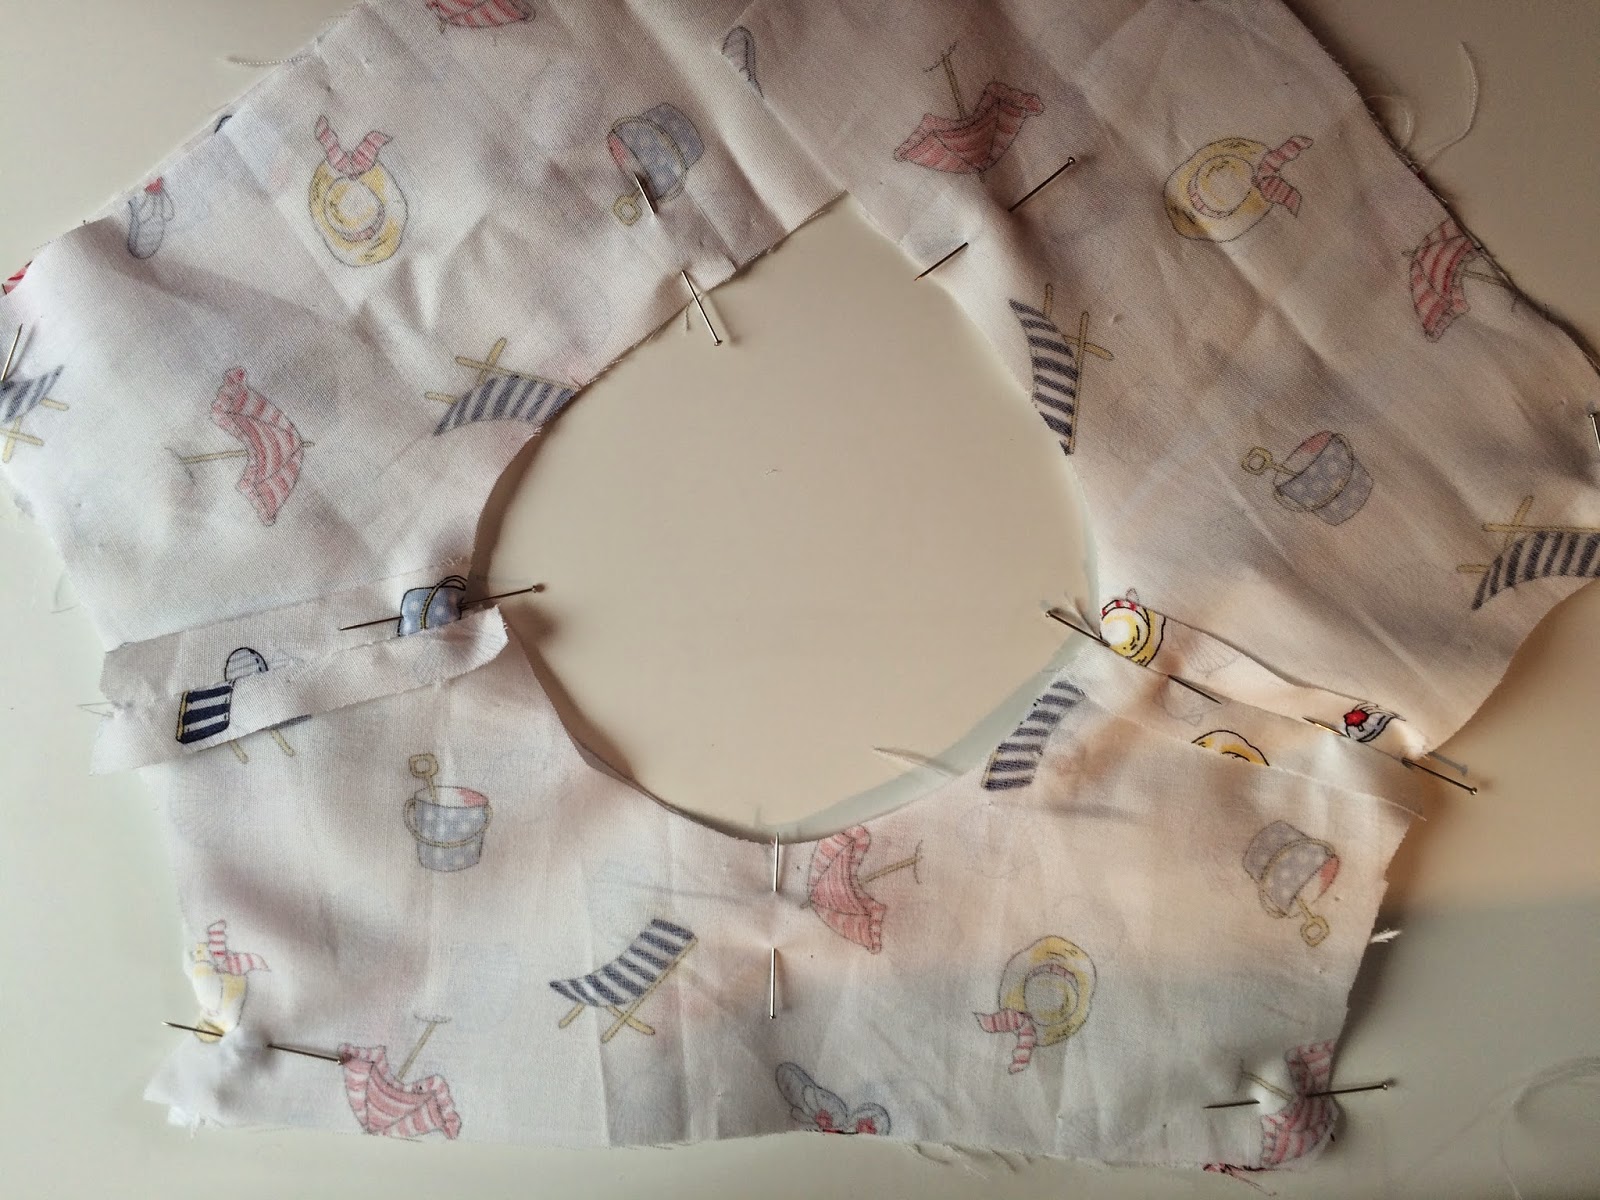
We will need half metre fabric (1.50 width). Fold it in half and fold it once again for the diaper cover, so we get 4 layers of fabric when cutting it. Place the patterns on top of the fabric, dress and diaper cover centre front on the fold. We will also need 2 layers for the dress top, using the same fabric as lining.
Coloca los patrones sobre el medio metro de tela que se necesita (1,50 m de ancho), doblado por la mitad, a lo largo. Vuelve a doblar un trozo donde quepa la braguita, para obtener 4 capas. De la museta necesitaremos también 2 capas (utilizaremos la misma tela como forro). Coloca el centro delantero (CF) del vestido sobre el doblez, así como el de la braguita.


Cut the fabric around the patterns, they already have 1 cm seam allowance plus 4 cm hem.
Corta la tela alrededor de los patrones, éstos ya tienen 1 cm de costura y 4 cm de dobladillo.

Cut the notches where marked as well as CF to know where is the centre of the piece.
Haz piquetes donde está marcado en los patrones así como en el centro delantero (CF) para saber cual es el centro de la pieza.

TRANSFER PATTERN MARKINGS
MARCAR POSICIÓN DE BOTONES Y OJALES

Esta técnica se realiza para marcar en el interior de la tela donde no podemos hacer piquetes, en este caso, para marcar la posición de botones y ojales: Enhebra una aguja y coloca el hilo doble. Pasa por el centro de la marca y vuelve a pasar por el mismo sitio cogiendo todas las capas de tela, y dejando una argolla de hilo (no tirar del todo) y cortar el hilo. Repetir con un hilo nuevo en casa marca. Así cuando quitemos el papel quedarán todas las capas marcadas. Os dejo un vídeo donde se explica muy bien:
VIDEO: How to Transfer Pattern Markings:


OVERLOCKING
REMALLAR

After removing all patterns it's time to overlock the skirt side edges and hem. Don't need to overlock the top as it will be hidden with the lining.
Después de quitar los patrones, es hora de remallar los bordes laterales del vestido así como el bajo. No hay que remallar la parte de arriba ni la museta ya que irá escondido con el forro.
GATHERING
FRUNCIR
Gather the skirt front and back until you get the measurement marked on the pattern, so it meets the top part of the dress. Here you have a video tutorial so you learn how to easily gather fabric.
A continuación frunciremos la parte superior de la falda, delantero y trasero, hasta conseguir la medida marcada en el patrón, para hacerla coincidir con la medida de la museta. Os dejo un video explicativo para aprender a fruncir fácilmente.
VIDEO: How to gather fabric:


TOP AND RUFFLED SLEEVES
MUSETA Y VOLANTITOS
Cut 2 fabric strips about 6 cm wide and 20 cm long. On one side, make a very thin rolled hem. On the other side, gather the fabric as much as you can, until you get a nice ruffle.
Corta dos tiras de tela de unos 6 cm de ancho y 20 cm de largo aproximadamente. En un lado, haz un pequeño dobladillo. Frunce el otro lado lo máximo que puedas, hasta obtener un volante bonito.


Then, join the top front and back pieces at the shoulders. Right side with right side. You will have 2 sets of tops as one will work as the lining.
Después, une el delantero y traseros de la museta por los hombros. Derecho con derecho.
Repite con la otra museta que hará de forro.

Place the ruffle as shown in the image, on top of the arm hole, right side of the fabric.
Leave the ends of the ruffles inside the armhole so they look rounded on the right side.
Coloca el volante sobre la sisa como se muestra en la imagen, derecho con derecho.
Deja los finales del volante hacia dentro de la sisa, de manera que por el derecho queden los extremos redondeados.

Stitch the ruffle to the arm hole, at 0.75 cm from edge, so it will be hidden when stitching the lining at 1 cm seam allowance.
Cose el volante a la sisa a 0,75 cm del borde, para que cuando cosamos el forro a 1 cm éste quede escondido dentro.

Make sure it looks nice on the right side.
Asegúrate de que se ve bien por el lado del derecho.

Once you are happy with the result, cut the extra ruffle fabric at the armholes.
Cuando hayas comprobado que te ha quedado bien, puedes cortar el exceso de tela de los volantes en la sisa.

Place the other front and back top set on top, right side to right side, matching shoulder seams, armholes and neckline. Pin it.
Coloca la otra museta encima de ésta, derecho con derecho, haciendo coincidir las costuras de los hombros, las sisas y el cuello. Sujétalo con alfileres.
Stitch them together around neckline and armholes at 1cm seam allowance (make sure you are not taking the hem of the ruffle).
Cose el cuello y las sisas con 1 cm de costura (ten cuidado de no pillar el filo de los volantes).

Turn it inside out through the shoulders. Press the neckline and armhole seams nicely from the outside.
Dale la vuelta pasando a través de los hombros, y plancha el cuello y las sisas con cuidado por el derecho.

SKIRT
FALDA
Stitch the skirt front and back pieces together at the side seams at 1 cm. Leave a 4 cm gap at the top for the armhole. Press the seams flat and top stitch around the gap as shown in the image.
Cose el delantero y traseros de la falda por las costuras laterales con 1 cm de costura.
Deja una abertura de unos 4 cm arriba para dejar más holgura a la sisa. Plancha las costuras abiertas y haz un pespunte alrededor de esta abertura como se muestra en esta imagen.


Also, press the 4 cm hem and 3,5 cm hem at the back, where the buttons and button eyes will be placed. It will be easier now to stitch the hems once ironed.
Plancha también el dobladillo del bajo de 4 cm y los dobladillos traseros donde irán botones y ojales, de 3,5 cm de ancho. Ahora será más fácil coser estos dobladillos, una vez planchados.


JOIN TOP + SKIRT
UNIÓN MUSETA + FALDA

It's time to join the top to the skirt. Firstly, make sure the width of the gathered skirt matches the top. Adjust the gathers if needed so they perfectly match. Now, pin the right side of the top to the right side of the gathered skirt, leaving the lining behind, unstitched.
Ahora vamos a unir la museta a la falda. En primer lugar, asegúrate de que coincide el ancho de la parte fruncida con el ancho de la museta, ajusta los frunces en caso necesario hasta que coincidan.
Ahora, sujeta con alfileres el derecho de la museta exterior con el derecho de la falda, dejando suelta la museta de forro.

Once the right sides are stitched, join the lining making a little 1 cm hem and pining so it hides the previous seam, as shown in the following image:
Una vez cosido el derecho, unimos el forro con alfileres haciendo un pequeño dobladillo de 1 cm y tapando la costura anterior como se muestra en esta imagen:

At once, will add the zig zag trimming on the right side, so when stitching it, will also join the lining on the other side. Make sure you stitch at the exact centre of the seam, so it will take the edge of the lining on the wrong side.
De una vez, vamos a coser un piquillo decorativo por el derecho, de tal manera que con la misma costura estaremos cosiendo el forro por detrás. Asegúrate que el centro del piquillo coincide con el centro exacto de la costura y por detrás ésta pillará el forro justo por el filo.


Repeat the same steps at the back.
Repite los mismos pasos por detrás.

Firstly you will need to finish up the ends of the back top, like this:
Primero tienes que terminar los extremos de detrás, así:


BUTTONS & BUTTON EYES
BOTONES Y OJALES

Add buttons and button eyes at the back, and you are done!!


DIAPER COVER
CUBRE PAÑAL

Join front and back at 1 cm side seams and bottom.
Une delantero y trasero por las costuras laterales y por la parte de abajo, a 1 cm.

Overlock the seams.
Remalla las costuras.

Iron the seams flat.
Plancha las costuras hacia atrás.


Make a hem at the top to insert the elastic band. Roll it all once at 0.5cm and repeat leaving enough wide to fit the elastic band, and leave a gap to insert it.
Haz un dobladillo en la parte de arriba para insertar el elástico. Dobla una vez a 0,5 cm y cose todo alrededor. Dobla otra vez asegurándote de que cabe el elástico de ancho, y cose todo alrededor pero deja un hueco para introducir el elástico.


Insert the elastic band through the gap with the help of a safety pin.
Introduce el elástico por el hueco con la ayuda de un imperdible.


Pull the elastic band gathering the fabric until you get the marked measurement.
Stitch the ends of the elastic band together and cut. Hide this seam inside the hem and close it with a top stitch.
Tira del elástico por el otro extremo y reparte bien los frunces, hasta obtener la medida marcada en el patrón. cose los dos extremos y corta lo que sobra. Esconde esta costura dentro del dobladillo, repártelo uniformemente y cierra el hueco cosiendo por fuera.

Repeat the same steps at the leg holes but making a smaller hem. You can roll it at once making sure you have room for the elastic band.
You will preferably use a thiner elastic band for the leg holes and a wider one for the waistband.
Repite los mismos pasos en los lados de las piernas, pero haciendo un dobladillo más pequeño. Enrolla el filo de una vez dejando suficiente espacio para meter el elástico, pero estrechito.
Lo ideal es utilizar un elástico más fino para las piernas y más ancho para la cinturilla.


Gather nicely util you get the right measurement, stitch and close the gap.
Reparte los frunces uniformemente hasta obtener la medida deseada, une el elástico con una costura fuerte y cierra el hueco.


DONE!!! ¡¡LISTO!!
FOLLOW @EtralaLondon


hey,
ReplyDeleteWhere are the pieces of the top and the sleeve of the pattern of the dress (diy baby girl dress) please ?
TY
hey
ReplyDeleteWhere are the pieces of the top and the sleeve of the pattern of the dress