 |
| DIY Tutorial. Quotes on Canvas. |
I love DIY. I love making myself very personal gifts and I always find a lot of inspiration on Pinterest. This time, I wanted to do a very special birthday gift to one of my best friends, Carolina, who was turning 30 -wonderful- years old.
So, at this point, I decided to make a Quote-on-Canvas project, including her name (vertical) and a special quote (horizontal) creating a crossword effect.
This project was inspired by this one, but I made it quite different.
Me encantan las manualidades (afición a la que ahora está de moda llamar Do It Yourself). Me encanta hacer yo misma regalos muy personales y para ello siempre encuentro toda la inspiración que quiero en Pinterest. Esta vez, quería hacer un regalo muy especial a mi amiga Carolina, que cumplía 30 - magníficos- años. Así que decidí hacerle un lienzo con palabras que tuvieran un significado especial, incluyendo su nombre (en vertical) y creando una frase (en horizontal) a modo de crucigrama.
Este proyecto está inspirado por este otro, aunque yo lo he hecho bastante diferente.

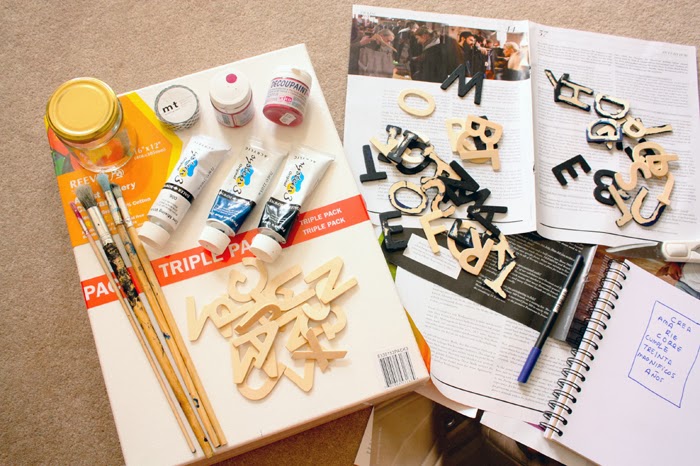
MATERIALS:
- Canvas / lienzo
- Assorted and contrasting acrylic paints / pinturas acrílicas de colores variados y contrastados.
- Assorted letters / letras variadas
(I tried with the vinyl letters but they didn't work for me)
(Probé con letras de vinilo pero no me funcionó para este proyecto).
- Newspapers / periódicos
- Paintbrushes / pinceles
- Water / agua
- Washi Tape (indispensable on all Pinterest's DIY as well as Mod Podge, what I'm not sure what's that yet...)
/ cinta adhesiva decorada, osea, washi tape
(Indispensable para todos los DIY de Pinterest junto con el Mod Podge, que aún no sé muy bien lo que es)
- Notebook and pencil to sketch the design
/ libreta y lápiz para dibujar el diseño
(One day I will tell you about my favourite art shop / algún día os hablaré de mi tienda de arte favorita: Cass Art London).
1. Draft a sketch with your idea of design, and make a draft with the letters on the canvas, to make sure that there's room enough for all of them.
Dibuja un croquis con tu idea de diseño, y plantéalo por encima del lienzo para asegurarte que caben todas las letras.
2. Start with the longest words or sentences as they will determine the letter's arrangement for the final design.
Empieza con las palabras o frases más largas, ya que van a determinar la distribución de las letras en el diseño final.
3. This is completely up to you, depending on "the artist". I painted two wide lines in pink to arrange the longest words on them.
Esto es cuestión de gustos, depende completamente "del artista". Yo pinté dos bandas anchas de rosa para poner las palabras más largas sobre ellas.
4. Afterwards, decorate with washi tape some other word's background. You can overlap lines of washi tape and paint.
Después, decorar con washi tape el fondo de otras palabras. Se pueden superponer bandas de washi tape con pintura.
5. This is the tricky part of the project. Start placing words on the canvas, on top of the painted or decorated lines, and start painting very carefully (hold the letter with the other hand) with the most contrasting colour (I used black) around the letters. (the actual letters will leave a blank space without paint, that will allow to see the background).
Esta es la parte más difícil, con la que hay que tener mucho cuidado. Empieza a disponer las letras sobre el lienzo, encima de las bandas que hemos pintado o decorado con washi tape. Empieza a pintar con mucho cuidado (ve sujetando cada letra con la otra mano) alrededor de las letras, con la pintura del color más contrastado (yo usé negro). Las letras dejarán un hueco en blanco que dejará a la vista el fondo.
6. Repeat the process with every single word, and fill out the rest of the canvas with the same black paint. Leave the paint to dry and remove the letters afterwards.
Tip: you can paint the letters in white or the same background colour to amend the imperfections that could happen.
Repite el proceso con todas las palabras, y rellena el resto del lienzo con la misma pintura negra. Deja secar la pintura y retira las letras después.
Truco: puedes pintar de blanco o rosa (o la pintura que hayas usado de fondo) para rellenar las letras si te han quedado "bigotes" negros.
 |
| DIY Tutorial. Quotes on Canvas. |
Voilà! You are done!
It's very easy, isn't it? Do you dare to make yours?
¡Y voilà! ¡Ya está listo!
Es muy fácil, ¿verdad? ¿Te atreves a hacer el tuyo?
Follow us:


Confirmo que es un regalo original y personalizado que hace muchiiiiiiisima ilusión!!! Muchas gracias!!
ReplyDeleteIts' awesome idea, love the performance
ReplyDeleteHave a great week ahead,
http://lavenderloafers.com
Very cute! xxx
ReplyDeletereallyliteral.blogspot.com