

by @mariaetrala
Hello!
Here I'm going to show you how to make this easy and cute baby romper, step by step.
(0-3 months size)
What you need:
- Outer cotton fabric: 25 cm
- Lining cotton fabric: 25 cm
- Narrow Elastic band
- 2 buttons
- Matching threads
- Sewing machine and overlocker (if you have).
- Sewing kit (scissors, pins, needle, thread, etc.)

DIY: Ranita Bebé
Hola! Aquí os voy a enseñar paso por paso cómo hacer esta ranita de bebé tan mona, es muy fácil!
(Talla 0-3 meses)
Necesitas:
- Tela de algodón para exterior: 25 cm
- Tela de algodón para el forro: 25 cm
- Elástico estrecho
- 2 botones
- Hilo al tono
- Máquina de Coser y Remalladora (si tienes)
- Caja de costura (tijeras, alfileres, aguja, hilo, etc.)

- First thing first, you will need to print the pattern, cut it out and join the pieces where indicated.

2. Fold in half both the outer fabric and lining and place them together. Place the Front Pattern with CF on the fold, and the Back Pattern at one side. The pattern has 1cm seam allowance included.
Coloca las dos telas, exterior y forro juntas y dobladas por la mitad.
Coloca el patrón frontal con el centro en el doblez, de manera que al cortarlo obtengas la pieza doble.
Sitúa el patrón de la espalda al lado, obtendremos las piezas separadas y tendremos que hacer una costura en medio. Tienen un margen de 1 cm de costura.

3. Pin your patterns to the fabrics to prevent them from moving. Make sure your patterns are well alined on the fabric straight grain.
Coloca los alfileres por todo el alrededor de los patrones para que no se muevan al cortar.
Asegúrate de que quedan bien rectos al colocarlos, "al hilo". Es decir en paralelo a la dirección del hilo del tejido.


4. You can now start cutting the pieces out around the very edge of the patterns, as the seam allowance is already included. If you prefer, you can leave more seam allowance but it's not needed for a small, baby garment.
Ahora puedes empezar a cortar por todo el alrededor, al filo, ya que está incluido en el patrón 1 cm de costura. Puedes dejar más si quieres pero no es necesario en una prenda tan pequeña.

5. We now have cut the front and back pieces, outer fabric and lining at the same time.
Ya tenemos las piezas frontales y traseras cortadas, tela exterior y forro a la vez.

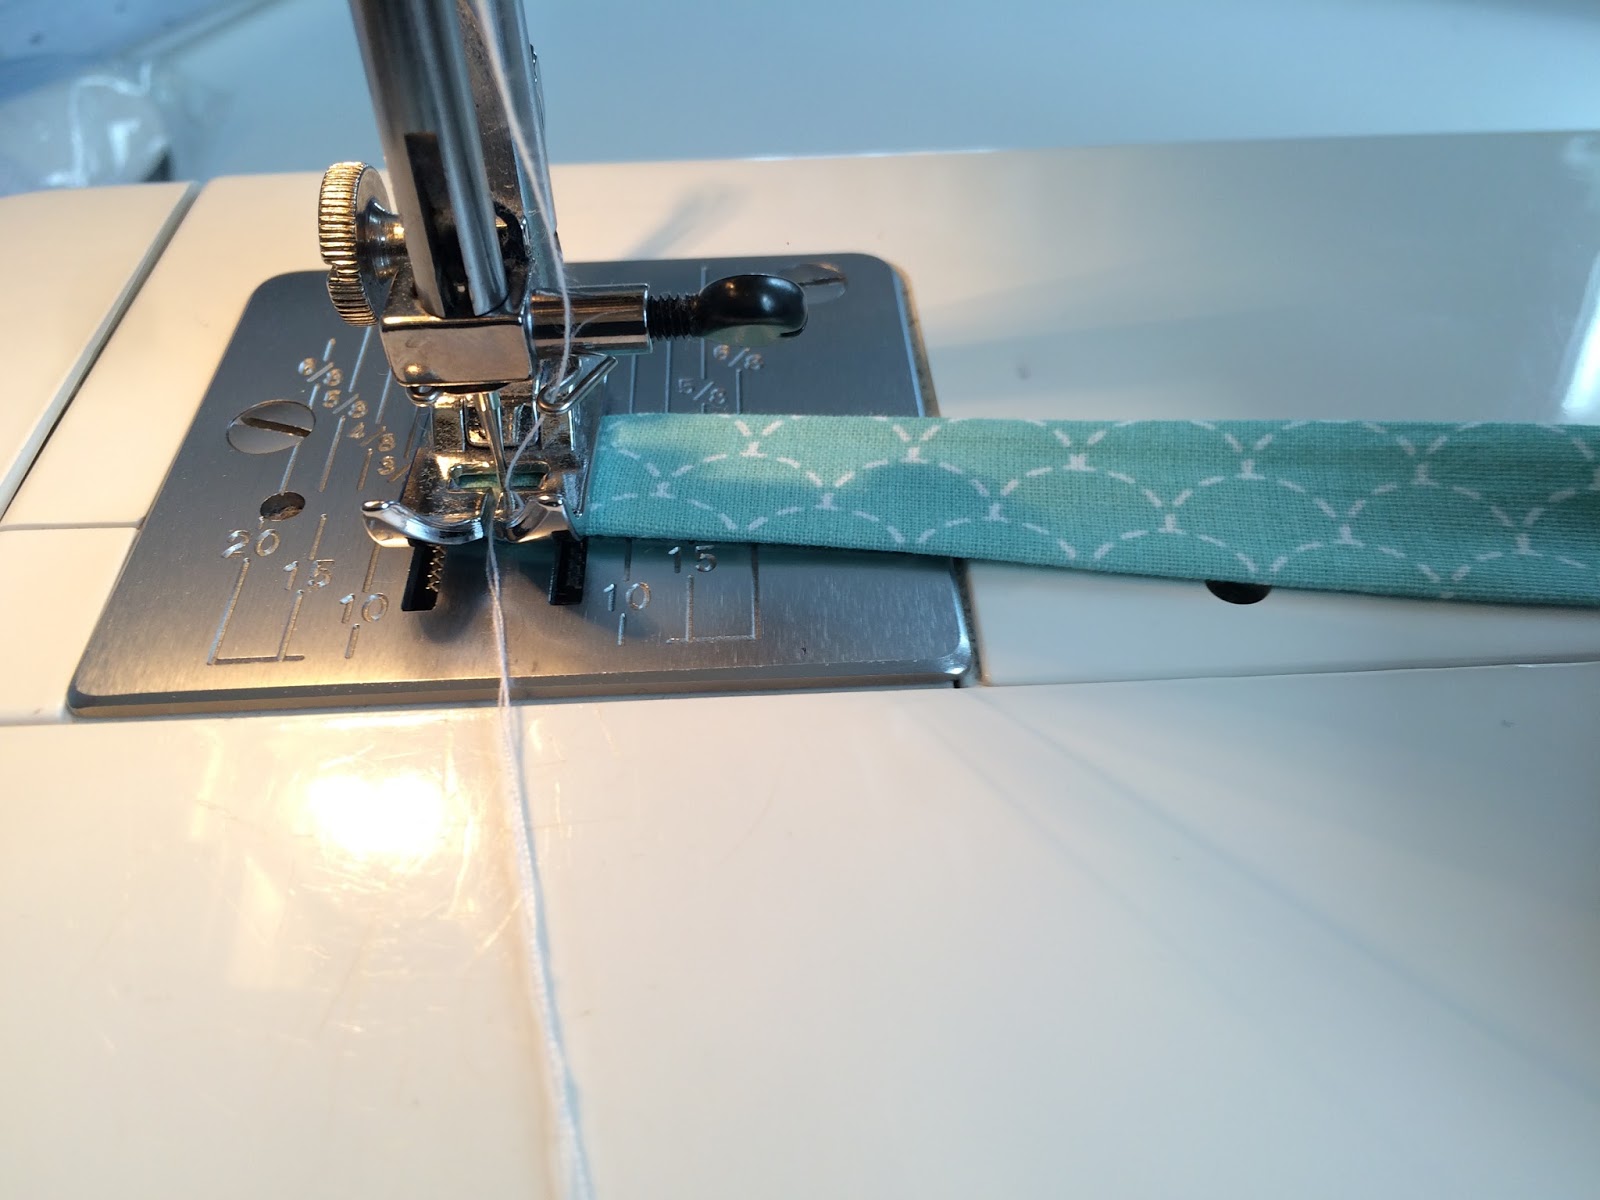
6. Also, cut a fabric strip for the neck-tie (it can be from the same fabric or a contrast one, depending on your design). Cut it 5 cm wide x 90 cm long.
Por otro lado, corta una tira de tela exterior para la lazada del cuello (u otra diferente que coordine para contrastar con la prenda y no hacerla toda de la misma tela).
5 cm de ancho x 90 cm de largo (45 cm doblada por la mitad).

7. Fold the fabric strip in half, right side inside, and sew along the strip.
Empezamos a coser por la lazada. La doblamos a lo largo por la mitad con el derecho hacia dentro, y cosemos un pespunte a todo lo largo.

8. With the help of a safety pin, turn it inside out. Pin it to one end and get it through the "tube" until you can find it on the other end and pull.
Después le damos la vuelta a la tira con la ayuda de un imperdible, que cogemos en una punta y vamos metiendo por dentro hasta que nos aparezca por el otro extremo.


9. Press the strip with the iron leaving the seam at one side.
Después plancha la tira con la costura en un lateral.

10. To finish up the ends, turn the edge of the fabric inside and top-stitch to close the ends.
Ahora terminamos los extremos metiendo el filo de la tela hacia dentro y cosiendo un pespunte por el filo.


11. On the other hand, we have the romper's front and back pieces. Pin the front and back together, right side to right side, along the 2 sides, and sew together. When it's done, sew the centre back seam leaving a little opening at the top (marked on the pattern) to make it easier to get the baby head in.
Now repeat the same steps with the cotton lining. Press the seams open with the iron.
Por otro lado tenemos las piezas principales de la ranita.
Cosemos frontal y trasero por los costados, con el derecho de la tela hacia dentro. Y después unimos las 2 mitades traseras en una costura central hasta el piquete de arriba, ya que dejaremos una pequeña abertura en el cuello para que sea más fácil meter la cabeza del bebé.
Repetimos los mismos pasos por separado con el forro y planchamos las costuras abiertas.


First, place the outer fabric back opening opposite the lining opening, and see how it has to look once finished. Now, pin the fabric left side together with the lining left side, and repeat with the right sides, as shown on the images.
A continuación vamos a hacer la parte más difícil, que es coser la tela con el forro por la abertura superior, de manera que quede perfectamente forrada y no se vean las costuras ni el interior de la prenda.
En primer lugar tenemos que enfrentar la abertura de la prenda exterior con la abertura del forro, con las costuras hacia dentro y tanteamos como tiene que quedar terminado.
Entonces ponemos alfileres en cada lado de la abertura de la tela exterior con la misma parte del forro desde el filo superior hasta el piquete donde empieza la costura central de la espalda, y repetimos lo mismo con la otra mitad de la abertura.


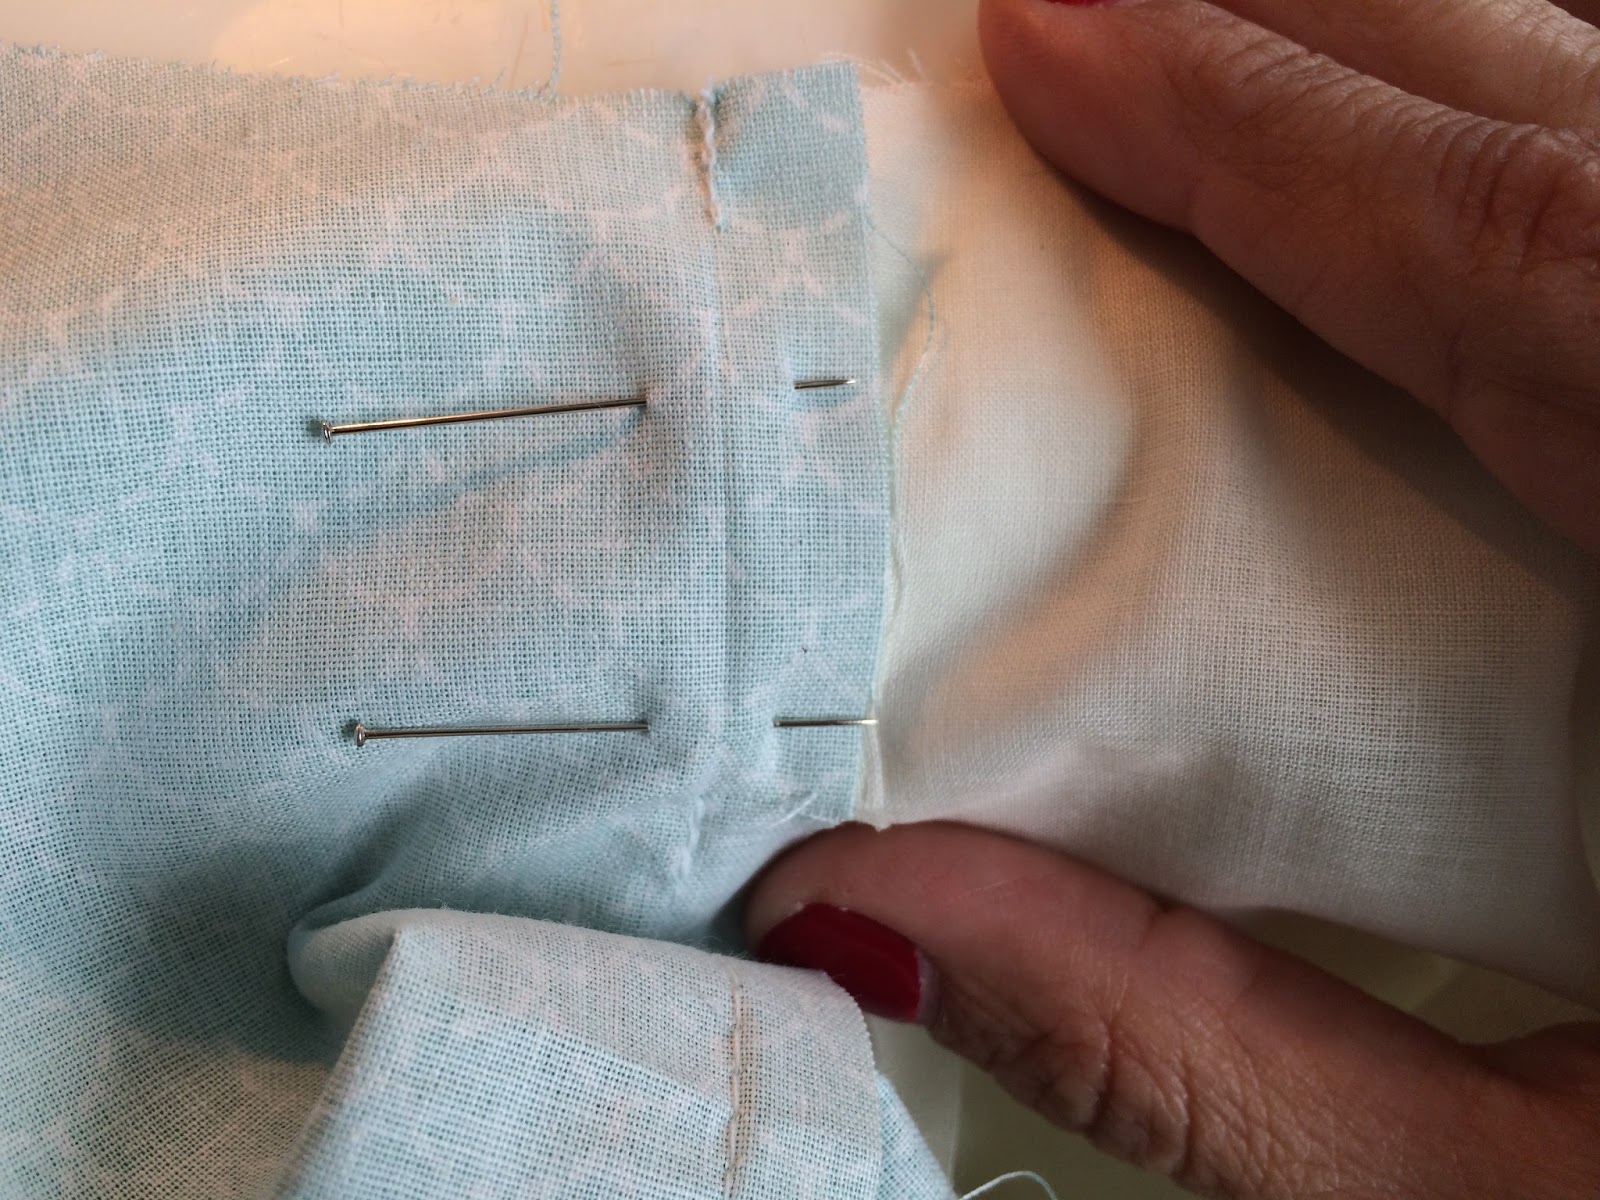
BUT we have to leave a 1.5 cm hole on both sides, t 1 cm from the top edge, to allow the tie get through.
PERO debemos dejar un hueco de 1,5 cm aproximadamente en ambos lados, a 1 cm del filo superior, ya que después tendremos que meter el lazo por aquí.


Afterwards, open the seams flat and top stitch on the very edge of each side as shown on the image below.
Después abrimos las costuras que acabamos de hacer y echamos un pespunte por el borde de cada lado como se puede ver en la foto inferior, para que quede el agujero por donde pasará el lazo bien terminado.

It will look like this once folded:
Al doblarlo de nuevo quedaría así:

And this is how the back opening will look finally. I told you this was the hardest part!
Y así quedaría la abertura central de la espalda terminada. Ya os dije que esta parte era la más difícil 😜

We will now finish the front neckline. Place the outer fabric and lining together, right side to right side, pin and sew all around the neckline at 1 cm from the edge.
A continuación coseremos el cuello delantero. Ponemos el cuello de la tela exterior y el del forro enfrentados, con el derecho hacia dentro y el revés de la tela hacia fuera, sujetamos con alfileres y cosemos a 1cm todo el contorno del cuello.

Repeat the same steps with the back neckline, from the shoulder to the centre back opening, both left and right sides.
Repetimos este paso en la parte posterior del cuello, desde el hombro hasta la abertura central, en ambos lados.


En este caso como en todas las costuras redondeadas, hacemos piquetes para que al volver la tela quede más asentado.

This is how the front and back neckline will look once turned inside out.
Press with the iron, always leaving a little edge of the outer fabric shown to avoid the lining to get seen.
Así nos quedaría el cuello por delante y por detrás al volver la tela.
Planchar para que asiente bien, siempre asomando un filito de tejido exterior y que el forro quede un poquito hacia dentro, para que desde fuera de la prenda no se vea el forro.

Turn it again inside out and repeat the neckline steps on the armholes, but leaving a 1.5cm hole at 1cm from the edge to get the tie through, as shown on the image below.
Volvemos otra vez y repetimos lo que hemos hecho en el cuello con la sisa.
Enfrentamos tela y forro con el derecho hacia dentro, y las costuras laterales quedarán hacia fuera.
Cosemos todo el alrededor pero de nuevo dejamos un hueco en cada extremo de 1,5cm por donde pasará el lazo, como se puede ver en la imagen inferior.

Turn it inside out and with the help of the scissors's point, push the edges inside the hole.
Volvemos la prenda y con la ayuda de la punta de la tijera, le damos forma al hueco por donde pasará la cinta, y metemos la tela sobrante bien hacia dentro.


Once again, press the seams with the iron, leaving an outer fabric edge seen from the outside, and the lining hidden.
De nuevo planchamos para asentar las costuras, dejando la tela exterior ligeramente más hacia fuera que el forro, para que éste no se vea.

Top stitch the neckline at 1.5 cm from the edge, to get the tie "tube" shaped.
Después, echamos un pespunte a 1,5cm del filo alrededor del cuello, por delante y por detrás, para formar el "túnel" por el que va a pasar la cinta.

You can see above how the outer fabric is shown and the lining hidden when looking at the garment from the outside.
Aquí arriba podéis ver como asoma un filito de tela exterior y el forro queda más hacia dentro, como he explicado anteriormente, para que no se vea.

We now have the "tube" where the tie can get through the garment. We now have the top part finished and we are going to continue with the bottom.
Ahora ya tenemos un canal por el que pasará la cinta que ataremos al cuello.
Tenemos terminada la parte de arriba y ahora vamos a continuar por la parte de abajo de la ranita.

First, stitch the fabric and lining together all around the bottom, at 0.75 cm from the edge (the foot width)
Empezamos por pespuntear todo el alrededor para unir el tejido exterior al forro, a menos de 1cm del filo: 0,75 cm suele ser el ancho de la patilla.


If you have and overlocker, you can finish the rough edges with it. Otherwise, use a zig-zag seam with your sewing machine.
Una vez tenemos todo el bajo pespunteado, pasamos a remallarlo si tenemos máquina remalladora, y si no haremos un pespunte en zig-zag con la máquina de coser por los huecos para las piernas, la entrepierna no hace falta remallarla porque llevará dobladillo.


Cut great notches at the corners to make it easier turning the hems.
Una vez tenemos las "piernas" remalladas, hacemos un buen piquete en diagonal en las "esquinas", para que luego se doblen bien.

Fold once a little hem on the front and back and top stitch.
Hacemos un pequeño dobladillo en la entrepierna, en la parte frontal y trasera, doblando una sola vez hacia dentro y haciendo un pespunte.


Fold again on the opposite direction, outwards, and pin it both sides to hold it.
A continuación, doblamos otra vez pero en sentido contrario, es decir, hacia fuera, y ponemos un alfiler en cada extremo para sujetarlo.


Sew both sides at shown below:
Cosemos el trocito del dobladillo a cada lado de la entrepierna, como se ve en la imagen inferior:

It will look like this:
Nos quedaría así:

Turn it inside out so the seams will be hidden inside. This is where the corner notches help.
Después lo volvemos de fuera hacia dentro para que queden las costuras escondidas en el interior.
Para esto eran importantes dos buenos piquetes en diagonal en las esquinas.


We are now going to sew the elastic bands at the leg holes, to the measure of the baby thighs. I used a 3-months-size bodysuit to get the right measurement.
A continuación vamos a coser los elásticos de la braguita, a la medida del muslo del bebé.
Yo me he guiado por el tamaño de un body talla 3 meses, para saber cuánto tenemos que fruncir con el elástico.


Place the elastic band at the end of the leg hole, at 0.8 cm from the fabric edge, and hem the fabric 1 cm covering the elastic band. Hold it with your finger and enter in the sewing machine, sew the end of the elastic and the hem together to set it down.
Colocamos la punta del elástico en un extremo, a un poco menos de 1cm del borde, y después doblamos la tela por encima del elástico, haciendo un dobladillo de 1cm por encima de éste, lo metemos en la máquina y apuntamos bien el extremo del elástico en su sitio para que no se nos vaya.

Sew the fabric hem at 1 cm and avoid catching the elastic.
Cosemos el dobladillo dejando el elástico por el medio con cuidado de no pisarlo con la costura, haciendo un pequeño canal para éste.


Once we have reached the end, leave the needle inside the seam and pull from the elastic band to gather the fabric until you get your measurement, to finally stitch the elastic in place. Cut the extra elastic.
Cuando hemos llegado al otro extremo, sin levantar la aguja de la tela, tiramos del elástico frunciendo hasta llegar a la medida de la pierna que habíamos determinado, y entonces cosemos bien el extremo del elástico para que no se mueva de su sitio, y cortamos el elástico sobrante.


Repeat the same step on the other leg hole, being very careful of getting the same measurements. Avoid one leg hole to be bigger than the other one!
Así es como quedaría una pierna, y ahora tenemos que repetir los mismos pasos para la otra, cuidando que nos quede a la misma medida, y no una pierna más ancha que la otra.

Let's introduce the tie through the neckline, with the hep of a safety pin.
Ahora vamos a coger la cinta que va a ir metida alrededor del cuello y le ponemos un imperdible en la punta, con el que nos ayudaremos para pasarla por el canal.


Start and finish at one side, where you want the bow to be.
Pasamos la cinta por todo el alrededor del cuello, empezando y terminando en un lateral donde quedará la lazada.

Pull and gather the fabric, and tie a nice bow at one side.
Tiramos y fruncimos y hacemos un lazo con la cinta restante.


The last step will be to sew the buttons (back) and make the button holes (front) for easy nappy changing.
Por último, vamos a coser los botones en la parte de abajo (trasera) y haremos los ojales (en la frontal).

Measure the button holes size marking with pins.
Medimos el tamaño de los ojales marcando con un alfiler a cada lado de donde irá cada botón.

Set your sewing machine on "button holes" position and minimum stitch length.
Colocamos la máquina en posición de hacer ojales, con el largo de puntada al mínimo.
Empezamos por la posición 1, después, 2, 3 y 4.


Once you have finished the button holes, cut inside to get the buttons in.
Una vez tenemos los ojales cosidos, rajamos por el centro haciendo el agujero por donde pasará el botón.


Hand stitch the buttons in central position with the button holes.
Ahora cosemos a mano los botones en posición centrada con cada ojal.


DONE!!
Did you find it too difficult? It's actually easier than it looks!
¡¡Terminado!!
¿Te ha parecido muy difícil? ¡Es más fácil de lo que parece!


Thanks for your attention! Hope you get your baby romper done! please show me your pics!
¡Gracias por tu atención! ¡Espero que te salga bien tu ranita... enseñáme fotos!
x Maria x
Follow me on Instagram
Hola, en que tamaño de hoja debo imprimir el patrón? lo imprimí en tamaño carta pero no se si me modifico las medidas
ReplyDeleteWhere do I get the pattern?
ReplyDeleteYou can click on the link "download your pattern for free here". Click on the sentence.
DeleteThanks !!
I have looked up and down the page, where is that link?
DeleteAnonymous- It's at the very top, just above the what you need list.
DeleteLove this little romper, do you have a pattern for 12mo?
ReplyDeleteооо, это замечательно!!
ReplyDeleteБольшое спасибо за подробное описание и даже с выкройкой!
Вы волшебница!